The Top 9 Things I Have Bought for My Classroom on Amazon:

*This post contains affiliate links which means I get a small commission if you purchase with the link at no additional cost to you.

This school year, I have bought classroom materials more from Amazon than any other supplier. I find that there are many times when I realize I need something last minute and I don’t have the time to wait up to two weeks to get what I need from large school supply companies. Plus, the company we are supposed to order from in my county always has things that are back ordered and sometimes it will take months for your items to get to you! So I highly recommend Amazon if you can get approved to purchase your materials there.

It is important to note that if you are purchasing with a credit card that is issued by the school or county, you will need an Amazon business account so you don’t get charged for tax. The process is super easy and you can sign up here.

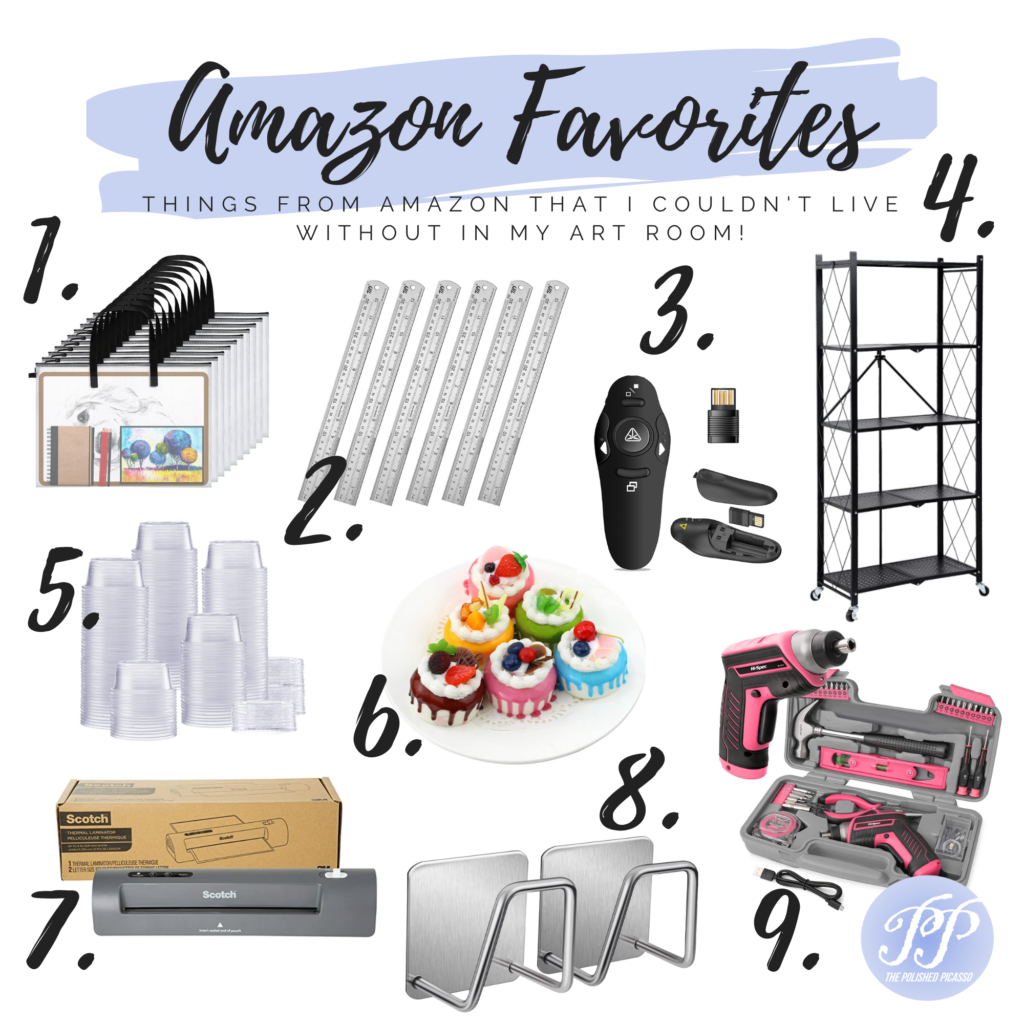
The following are my top 9 purchases that I have made this year that I simply could not live without!

  1. Portfolio Bags– These large portfolio bags are great for so many things! One thing I use them for a lot is for students to take their work home in. A lot of my students that work a little bit slower or have been absent, choose to take their work home so that they can get it done by the due date. These are great for that because they fit even the largest artworks we have made this year and they prevent the students’ work from getting wet or wrinkled.

The original reason I purchased these bags was to use as table “folders”. In order to store my students’ work, I used to have large paper folders made out of tag board that they would put their in-progress work in and then I had a storage unit that had one large drawer for each period to put their table folders in. This system worked well but the folders themselves weren’t great because they got super torn up so I had to remake them about every quarter.

Now that we have these bags, the students’ work falls out less because there is a zipper at the top. The handles also make them easier to carry to and from their tables. I will definitely be ordering more of these next year!

2. Metal Rulers– One thing that I can’t stand that my middle schoolers do way too often is snapping rulers. :/ When we use plastic ones, they are always getting broken! So when we moved to using these metal rulers, there was a lot less destruction. They also save us money because we don’t have to buy new rulers every year.

3. Presenter Remote– This remote is a game changer for classroom management! It allows me to move around the room and use proximity with students while presenting my slide shows. It also has a laser so I can point out important things about an artwork from across the room.

4. Fold-Up Shelving– This fold-up shelving system with wheels has been a life saver. When my students make sculptures, I typically have them store them on the counters around the room. I cover each counter with the roll paper that is that class’ color (I color code my classes) and then I divide it into multiple sections- one for each table. This year, I am sharing my room with another teacher so there is very limited counter space. My solution was purchasing this cart so that each table could put their sculptures on a designated shelf. It literally took less than 5 minutes to set up and is super light weight and easy to move (has wheels) but sturdy enough to hold a lot of work. The best part is that it can easily fold flat so when you are not using it you can store it away easily. This thing is seriously SO handy!

5. Condiment Cups– These cups are so versatile and come in handy all of the time! One thing I use them for is when students want to take their paintings home to work on them, they can take a small container of each paint color they need at home without trying to bring an entire palette which usually has a higher chance of spilling. I also used them this year for a hyperrealistic water painting unit I did with my 8th graders. Students basically made their own paint by numbers so they mixed up a good amount of each color paint that they needed, put each color in a separate container, and labeled them with a particular number with Sharpie. Students put all of their cups in a Ziplock bag which was then stored in boxes for each table. So at the beginning of each class, students would simply go to the box with their table number on it, pull out the bag with their name on it, and then paint each pre-numbered area with the paint in the cup that had the corresponding number.

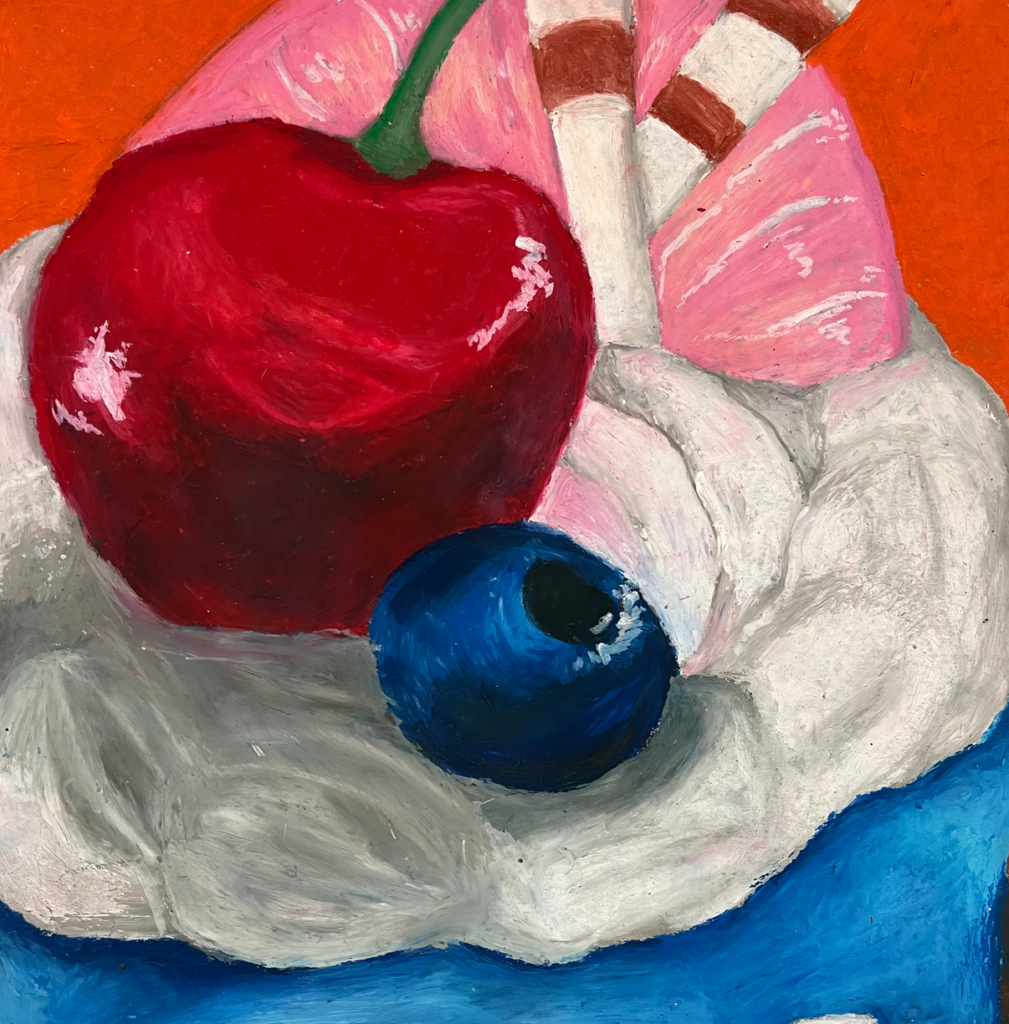
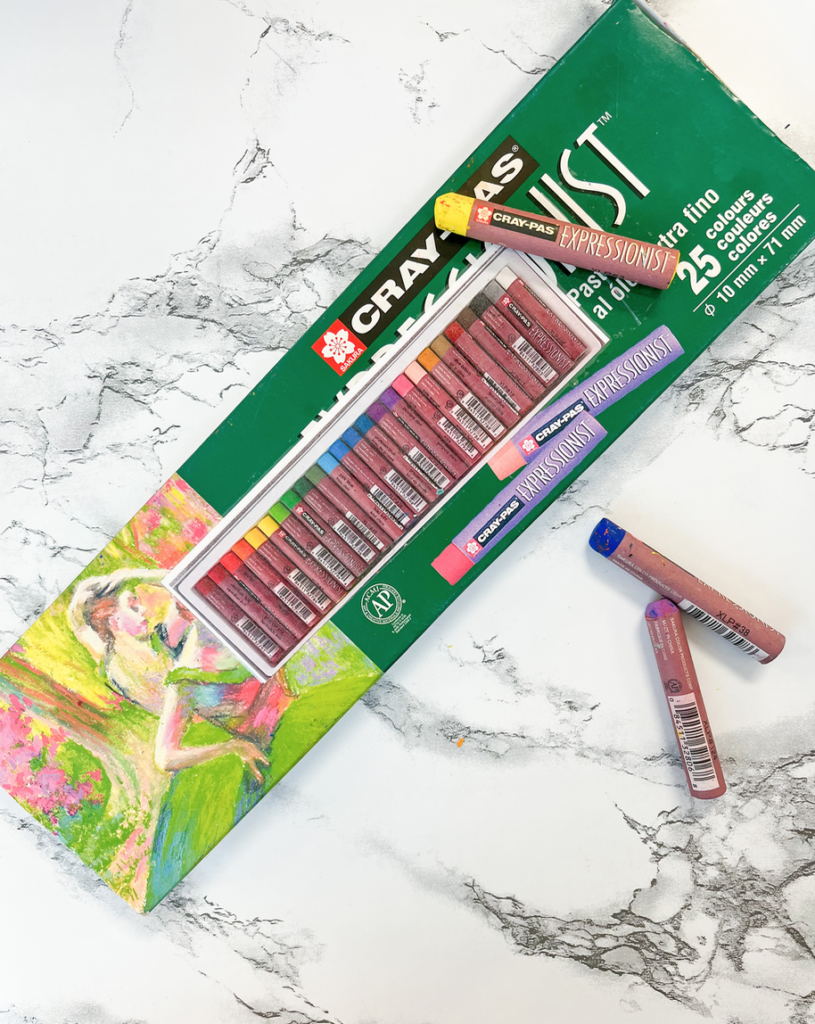
6. Faux Desserts– I love these adorable faux desserts for observational drawing. What I like to do is purchase a class set and let students choose the one they want to draw. Then I advise them to place the dessert on a piece of contrasting colored paper and they choose an interesting part of the dessert to draw. I had my students use oil pastels to draw these desserts but you could have students use any colored media. If you are interested in the unit I am referencing, you can check it out here.

7. Laminator– This is hands-down my most used purchase from Amazon. It is great for laminating smaller things as it fits 8.5″ X 11″ papers. I love using mine to laminate name tags for artwork displays, viewfinders I make out of index cards, and game pieces or other resources that I want to use for years to come. Here are the laminating pouches that go with it.

8. Sponge Holders– I put these sponge holders in the sinks at school in September and they have not budged! I haven’t had the best luck with things that have adhesive backs but these babies have never fallen. I simply made sure the sink was dry, pulled off the paper backing, and stuck them on the inside of the sink. Now, Students have a place to put the sponges when they are done cleaning out their palettes or wiping down their tables.

9. Tool Kit– One thing I never really thought I would need in my art room is a tool kit. But this cute pink one has really come in handy this year. I find that the cordless drill is great for attaching hardware to picture frames so that I can hang student artwork around the school. I also use the tape measure and level quite a bit.

5 of the Best Tips for Using Oil Pastels in the Classroom

*Disclosure: This post contains affiliate links. That means that if you click on the link and make a purchase, I will get a small commission at no additional cost to you.

Using oil pastels in my art room is a win-win for my students and I.  The kids feel like they are using a more sophisticated version of a crayon and I get to teach them color matching and mark making in a sneaky way!

Oil pastels are so vibrant and fun to use but they can also be a little intimidating if you have never used them with an entire class before (or even if you have). They can be a bit messy and sometimes students struggle with using them properly.  The following 5 tips are ones I have very helpful in using oil pastels successfully in my classroom.

  1. Never blend with your fingers. 
  2. Sandwich oil pastels to blend.
  3. Use an image on the box.
  4. Never use black.
  5. Always double check the floor!

Blended with fingers pic

  1. Never blend with your finger.

Okay, so this is a personal belief of mine that might be controversial for most art teachers.  Whether using graphite, charcoal, or oil pastel, I always try to encourage my students to use neat mark making and use the material itself to blend rather than a finger or a tissue.  Students are so tempted to blend using their finger but let me tell you why I discourage it…

When students blend with a tissue or their finger, the edges of their shapes tend to get blurred so they no longer look crisp and clean.  As a result, this technique can tend to make students’ drawings look messy and have visible fingerprints.  In addition, blending with your finger or a tissue dilutes the value.  If a medium-dark value is applied and then blended out with a finger, the value becomes more of a medium value than medium-dark.  This is a problem because students (especially middle schoolers) tend to not develop their dark values enough anyways so their drawings tend to lack contrast.  When students blend a value out to a lighter value, they very rarely think to go back in and deepen those darkest areas.  This pattern transfers to oil pastel as well.  

Sandwiches colors to blend pic

  1. Sandwich your colors.

Based on the paragraph above you’d probably think I’m against blending in general.  However, that is not the case.  I just think there are better ways to do it.  I like to tell my students to make an oil pastel sandwich when mixing two colors.  I tell them to first lay down a light layer of the most prominent color, then the color that you want to mix with it, and then top it with another layer of the prominent color.  If you use small circular motions when you do this, the color will be blended but not muddy.

  1. Use pictures to keep your boxes organized.

One thing I’m really happy I did before I had my classes bust into new boxes of oil pastels was taking a photo of the inside of the pastel box.  I then printed out this image and taped it on the top of the box with clear packing tape so that the students know which order to keep their oil pastels in. Believe it or not, being a neat freak and organization lover is not why I do this.  I add the image to the box so that the kids can identify right away if they are missing a color that needs to be replaced.  

Now, I’m not naive to the fact that 80% of the boxes do not end up back in that order at the end of every class.  However, it also helps when I have a student helper go through the boxes of oil pastels at the end of the unit to organize them.  They can use this image to help them make sure there are no duplicates, missing colors, or anything in the wrong order.  

Picture of cherry with and without black.

  1. Never use black.

I remember the first time I heard about not using black in an artwork was when I was in high school learning how to oil paint.  At first it sent me into a panic but now I teach the concept to all of my students.  The problem with using black is that it tends to flatten everything out and be a little too harsh in even the darkest areas. Also, there is really no true “black” in the world. It is simply a really really dark green, blue, or another color.  So I teach my students how to make a black “substitute” which is a mixture of dark brown and dark blue.  Using this combo helps establish a very dark value without looking flat.  

Most students are tempted to also use black to add to a color when wanting to create a shadow.  For instance, if they were drawing a red cherry, they’d be tempted to mix black into their red for the cherry’s shadow.  However, what works much better is one of two things.  Either the artist can add the blue/brown mixture to the base color (in this case red) or they can add the complimentary color to the base color.  Complimentary colors can be found by looking at what color is across from the color you are using on the color wheel.  If we go back to the cherry example, you’d want to add green to the area that has a shadow and then layer red back on top of it.  Here’s a picture to show you how much of a difference it makes!

Crushed oil pastel

5. Always check the floor!

Oil pastels are a PAIN to clean up off the floor- especially if they get stepped on.  I try to end class a few minutes early when using oil pastels so I can ask students to look around for any that have fallen on the ground.  If students find any, I take them and put them in a container so that I can use them as replacements when we need more of a particular color.  If you do tend to get oil pastel on the floor, consider using some dish soap on a wet towel.  I know it sounds weird but dish detergent has properties in it that help cut the grease and oil on dirty dishes.  Since oil pastels are oil based, the soap helps break down the oil and cleans the floor rather than just smearing it around.  Just make sure to rinse and dry the area well when you are done so that no one slips on a soapy floor.

Overall, I believe oil pastels are totally worth the mess and intimidation so definitely consider giving them a shot!  

If you want an awesome oil pastel unit to do with your middle or high schoolers, check out this unit in my TPT shop.

Here are the oil pastels I use in my classroom and love!

Hope this helps.

Happy teaching!

Christine 

The Best Way To Manage Sharp Tools in the Classroom

Disclaimer:  This post may contain affiliate links which means I will make a small commission if you choose to purchase through the specified link.

Using sharp materials is a scary but necessary thing in the art room… at least in a middle or high school art room.  Whether it’s printmaking gouges, etching tools, or x-acto knives, there is always a particular tool that art teachers are intimidated to use with their classes.  

This year, I learned the hard way that all tools, especially the dangerous ones, must be accounted for in an organized and efficient way.  It’s a long story… I DO NOT want this situation to happen to you so I have come up with some systems and ideas for how to handle using x-acto knives (and other sharp tools) in your classroom.

After reading this post you will have learned:

  • the best way to store x-acto knives
  • how to implement a sharp tools contract
  • How to distribute sharp tools
  • How to collect sharp tools

Storing Your X-acto Knives:

Until this year, I have never really figured out the best way to store and contain X-acto knives safely.  I have seen some custom made solutions on Pinterest like a wooden block with slits for the blades and things like that but they weren’t really attainable for me (I don’t have access to a saw to create something like that).  Thus, I have been looking for something that fits an X-acto knife (blade side down) and holds it in place.  I didn’t think I was asking a lot but unfortunately this solution has been much harder than I thought to find.

Earlier this year, I found this pencil holder on Amazon and it was the perfect solution!  There are 30 holes so there is enough space for a class set of knives and the holes are just the right size for placing a standard X-acto knife inside. (Please note that the X-actos do not fit blade side down if they have caps). Do all of your caps get lost too???  The holes are also numbered so if you number your X-acto knives, there is a designated spot for each one.

Speaking of numbering your knives, I used a piece of masking tape wrapped around the end of the knife (furthest from the blade) and a Sharpie to label each one.  This worked pretty well.  Full disclosure: I do want to eventually find a more permanent way to put the numbers on the knives because kids can simply peel off the tape if they really want to be sneaky.  Maybe some sort of engraving tool would work best for this? I’ll have to try that out and report back!

Making a Sharp Tools Contract:

You can get a FREE copy of my “Sharp Tools Contract” by clicking on the link below.

It is extremely important that students understand that using tools like X-actos and gouges is a privilege and not a right.  Therefore, they must handle them as such. 

I think the best way to hold each student accountable for their materials is to use a sharp tools contract. To be honest, I have not yet implemented a student contract in my classroom but I definitely plan on doing it the next time we use these tools.  

Before students sign the contract, I would demo how to use the X-acto knife or other tool by doing an in-person demo or a video demo.  A video demo is probably better because you can zoom in on the tool so students can really see what you are doing.  I used a video demonstration this year and I think it worked well.  Read the contract as a class and have students sign the document when you are finished going over it.

If a student is ever using a tool improperly, you can pull out the contract with their signature and reiterate that they promised to use the tools responsibly.  You can check out my FREE sharp tools contract and sign out sheet here.    

Distributing Sharp Tools:

You can get a FREE copy of my “Sharp Tools Sign Out Sheet” by clicking on the link above.

Holding each student accountable for their own tools is very important- especially when the tools come with a large amount of responsibility.  I have found that the best way to hold students accountable is to have them sign out their X-acto knives.  I created a simple form with a column for the number and the student’s name and have them come up to a central location to sign them out.

You may want the sign out sheet and the tools to be located near your desk so you have a better eye on them.  If you have classes of 33 students like me, this might take a while for all of them to get distributed.  So I suggest dismissing each table, one by one, to sign out their knives.

Another thing that could be a good idea is to use the X-acto knives at a designated station.  I did not do this but I got the idea from my fellow art teacher for whom it seemed to work really well!  He had one table in the room set up with 5-6 stations (each with a cutting mat and X-acto knife).  He then had students come to a station and cut while he watched over that table specifically.  I guess the trick with this is figuring out what the other students should be doing while they are waiting for a cutting station.  I know his classes are smaller than mine so this might work better if you have smaller class sizes as well.

How to Collect the Tools:

There are a few different ways that you can go about having the students return their sharp tools.  One way is to sign their X-acto knives back in on the sign out/in sheet.  If you do this, you just have to make sure that all knives have been accounted for.  If you use the pencil holder like I used, then all you have to do is make sure there are no empty holes.  This method is good for classes that you trust a little bit more.

The method worked for me until I had 5 go missing at the end of class one day. Unfortunately, this was before I used a sign out sheet.  It was a very scary moment and ended up turning into a huge deal with administration… but that’s a story for a different day!

What I do now is carry the pencil holder and walk around the room to collect the X-acto knife from each student at the end of class.  That way I can physically see them put the knife back in the container and I know who lost track of one if something like that happens again.  This seemed to work pretty well and I think it was definitely quicker than having all of the students sign their knives back in.

Give Yourself Grace:

The first time using these kind of tools with your classes can be intimidating and even scary.  All you can do it use your best judgement and try to have as many systems in place as possible to help you out.

Just remember, if a student really wants to destroy an eraser with an X-acto knife or use one in an inappropriate way, they probably would have found another way to cause this destruction even if there was not an X-acto knife involved.  You can only do so much and prevent so much!

I hope these tips help make using these tools a little less intimidating and give you a little more confidence going into projects that involve them.

Happy teaching!

Christine 

How to Hack the Free Version of Canva:

Want to be able to incorporate your exact brand colors without paying for the premium version of Canva?  Here is a quick and easy way to do it!

  1.  Pick out a template that you like for whatever type of design you want to create. I am working on a Pinterest pin design.
  1.  Go to “uploads” on the side menu, click on “upload files” and upload your brand logo.
  1.   Now insert the logo into your design template.
  1.  Because it is now one of the photos in the design, the colors within it will show up as options to choose from when changing colors of other elements.  For example, let’s pretend we are changing the color of the words to the exact shade of the logo.  Click on the word and then “text color” at the top.
  1. Now your logo/brand colors will be part of the options on the side menu when you change the colors of different elements.

6. Click on the color you want to use and the element should change to one of your brand colors!

That’s it!  The best part is that you don’t even have to include your logo in your design if you don’t want to.  Once you get the colors you need for a particular area, you can simply click on the image of your logo and delete it.  The color of the edited area should stay the same.

Happy teaching!

Christine

Cardboard Relief Sculptures

A guide to teaching my best selling TPT product!

*This post contains affiliate links

I remember the first time I taught my cardboard relief sculpture unit.  I was teaching at a private school and had my first experience teaching semester-long, media-based courses.  I wanted to come up with a sculpture unit that was inexpensive, incorporated the idea of relief sculpture, and was one that most students could be successful with.  I happened to put the unit on TPT on a whim and it started selling like crazy!  I think it was mostly due to the pandemic and the fact that students could still make a pretty impressive sculpture from home since they only needed cardboard, glue, scissors, and/or an x-acto knife.

It has been a couple years since I taught this unit so it definitely took some tweaking and refreshing but I think I have finally gotten it down to a science.  I thought I’d share the way I taught it so that you could do something similar if you wanted to in your art room!

How it started

On the first day of the unit we defined what sculpture was and I had students classify sculptures into two groups: sculpture-in-the-round and relief sculptures based on similar characteristics within the groups.  Once students had a good grip on relief sculpture, we talked about how artists show depth in an artwork. Eventually, we came to the idea of foreground, middle ground, and background.

Before I even showed students the final result of the project, we did a practice to identify the foreground, middle ground, and background of various landscape images from our magazine collection.  I used to have students use certain lines to identify each ground with permanent marker but that got hard to see on the image (especially if it was darker or black and white).  So this year, I pre-cut small pieces of tracing paper and had students use those same lines to trace each ground on top of the tracing paper.  This worked much better.

Give Them Options… But Not Too Many!

One of the big pushes in the county that I teach in is for students to create personal meaning in their artwork.  In order to help students feel more connected with their work, I always give them a menu of different options whether that be artists, techniques, format, medium, etc., to choose from.  However, I learned early on that if you give too many choices/options, students can start to feel overwhelmed.

The next step was introducing students to a list of about 15 artists.  I went through a presentation that featured a slide for each of the artists with a sampling of their work.  As we went through the slides, I told the students to circle or star their top three artists on the list on the handout.  Then I instructed them to research their top three and find the artist whose work they liked the most and a piece of theirs that interested them and showed a clear sense of depth.

The Preparation

Before the start of a final project, I always like to have the students practice the techniques that we will be using to create their main artwork.  First, I had students select one image, from a group of 4, to recreate in cardboard in the most basic way.  They simply identified the foreground, middle ground, and background, and then created each layer in cardboard.  When they were done drawing each layer, they cut them out and glued them on top of one another.  

After the practice with the relief technique, students practiced creating and replicating various textures through trial and error with the cardboard.  I gave them a handout with 6 different texture images (feathers, the siding on a house, bushes, etc.) and had them recreate each one on a small piece of cardboard.

Materials:

Unfortunately, there is quite a bit of prep with this project in terms of cutting. I suggest you start collecting and cutting the cardboard way in advance so you can just chip away at it rather than spending hours the day before.

The following are materials that you will need for your sculptures:

  • 6″ X 9″ pieces of cardboard for relief and texture practice (2 per kid)
  • 9″ X 12″ tagboard (1 per kid)
  • 9″ X 12″ pieces of cardboard (I would cut at least 6 per kid)
  • cardboard scraps
  • x-acto knives (1 per kid)
  • bottled liquid glue
  • scissors

Here are a couple of other helpful supplies that are not required but make life WAY easier:

  • electric scissors *(These are great for cutting cardboard into smaller chunks so that they fit on one of the large table top paper cutters. They literally glide through like butter… I’m obsessed!
  • holder for x-acto knives* (This little guy has the perfect sized holes to fit x-acto knives and makes it really easy to see how many are still missing at the end of class!)

The Template

This is what the template should look like before you start cutting the cardboard.

Now that students had a better idea of what the process was like, they finalized their artwork choices. Once the students had chosen the artwork they would recreate in cardboard, I had them print out an image of the artwork to use as a reference and gave them a piece of 9” X 12” tagboard.  On the tagboard, they were to draw the artwork they chose as accurately as possible.  This is simply a line drawing with correct proportions and all of the main details- no shading.  It is imperative that students do a good job on this part because they will use this exact drawing to create their cardboard sculpture.

The Process:

The process for creating all of the main layers of the sculpture was a bit tricky but once the students got the hang of it, they were off to the races!  The idea is that you are using a reductive method to create each layer using the template.  If you have ever made a reductive linocut print, the idea is similar.  Students cut off the layer of the template that was created by the previous layer of cardboard and then used the remainder of the template to create the new, raised layer.  Here are some photos that might make envisioning the process a little easier!

The Milkmaid by Vermeer

1. Create your template

2. Cut off the part of the template that you want to be the background piece of cardboard

 3. Trace the remaining piece of your template on a piece of cardboard and cut off the background.

4.  Glue that piece on to the background with liquid white glue.

5.  Cut off the portion of the template that you want to be created by the previous later.

6.  Cut out that piece of cardboard and glue it on the previous layer.

7. Continue the process until you have built up all of the main layers.  Then, add the textures and details with smaller scraps of cardboard. When you are finished, erase all of the pencil lines for a cleaner look.

If you prefer watching a video tutorial rather than reading, here is the video I showed my kids:

Check out these awesome student examples!

Display:

If you like displaying the students’ artwork as much as I do, you may be excited to put up a display after the unit is over. However, these guys are pretty tricky to hang. They are too thick to tack to a tack strip (which is what my school has) and too heavy to hang with tape or poster tack. What would be best is to put them in a display case with shelves. Unfortunately, my school only has 2 display cases for art and neither one have shelves.

So I had to do some creative problem solving. After a lot of trouble shooting, I came up with the idea to make small, light weight shelves using baseboard trim, tacks, and hot glue. Since there are usually at least 2 flat edges on the trim I would hot glue tacks to the back so that I could stick the trim piece right up against the back of the display case (the back of ours is cork board). Then I would rest the sculptures on the lip that the trim has created. I haven’t had a chance to create these shelves yet but check back here to see how I do it!

Want my full resource including the presentation, handouts, video tutorials and display signage? Check it out on my TPT store here!

*This post contains affiliate links

Happy Teaching!

Christine

Creating a Sense of Community through Art

*This point contains affiliate links

Making your art department’s presence known is super important for creating a school community through art.  Some ideas for promoting your department are hanging your students’ work up in the hallway and around the school, giving students the opportunity to participate in art shows, and having students take part in school-wide projects.

One school-wide project that my art club students have been doing since the beginning of the year is painting the windows in the media center.  The media center is in the middle of the school so it gets a lot of traffic.  There are about 16 windows that we are painting so it is a big task but the kids are loving it and it’s a great opportunity for the art department to be recognized by the school!

In order to accomplish a project like this, there are a few things to keep in mind.  Check out my advice for painting the windows in your school below:

Ask for Permission:

This is the MOST important thing to do before starting any project at your school.  I would make sure you not only have the administration’s permission but you also have the permission of the staff that work in/use that area.  In this case, the media specialist actually came up to me and asked if we wanted to re-paint the windows that had been painted previously so we knew it had already been approved by admin and the media team.

Clean the Area:

Cleaning the previously painted windows took me hours because I did not figure out what tools worked best until about halfway through (At least I get to save you guys the trouble!).  Once I discovered a good system, it went much more smoothly and my arms were not nearly as sore! 

The windows had previously been painted with tempera paint so I knew the artwork could be removed with water.  I filled a large bucket with water and a sponge and I first used a damp sponge to blot the entire window to moisten the paint.  Pro tip: DO NOT try to wipe the paint off with the sponge like I did.  The paint will be really hard to scrub off and it will be very streaky.  This method will also require wiping the windows down about 10 times because the paint just keeps smearing.  Instead, use a razor, like this, to scrape off the moistened paint.  The paint will almost come off in sheets.

You can skip moistening the paint with the sponge and go straight to the scraping but it can tend to sound like nails on a chalkboard and turns the paint into dust that goes everywhere.  So I suggest getting the paint damp before you begin scraping.

Prep the Area:

Although tempera paint comes off pretty easily with water, I did not want kids to have to wipe off their window trim after they started painting.  So I simply ran a line of painter’s tape along the trim of the windows so that we could keep that area clean and get clean edges for our paintings.

The next thing I would do is cover EVERYTHING in the area that you are painting with roll paper or butcher paper.  I was so scared of getting paint on the carpet in the media center so I covered the bookshelves, tables, and floor with roll paper (like the kind you use for bulletin boards).  Unfortunately I had to re-do this process every time we painted because we only have art club every other week and I did not want to leave that whole setup there for 2 weeks when the media center is used every day.

In terms of materials, I took one of the metal carts we had in the art room and filled it up with the following:

-paper plates (for mixing paint)

-brushes

-tempera paint jugs

-bucket of water (so we didn’t have to run back and forth to the room to fill our cups up in order to rinse out the brushes)

-foil (for covering the plates with paint at the end of the meeting) I love using this because it is so easy to grab and go!)

-permanent markers (to write their names on the foil on top of their paint plate)

-paper towels 

-dry erase markers (for sketching out the designs on the windows)

-razor (to scrape off any paint mistakes that have dried- make sure this is a tool only YOU are handling.  Do not let the students use this!)

-cups for water (I used just plastic SOLO cups).

Sketch out the design.

Before I even took students to the media center, I had them create 3 colored sketches on a handout that had boxes proportionate to the size of the windows.  When the students were done with their ideas, they showed me their three sketches and we discussed which one would be best for our project.  This is a really important stage because if you give students free reign for their designs, you could end up with very strange and/or inappropriate imagery (Seriously!  One student wanted to paint a demon cat and I had to quickly veto that idea).  I told them that our goal was to paint windows that inspired hope, creativity, inclusivity, kindness, and happiness.

This next tip was actually thought of by a student and I think it is super clever!  In order to sketch out their ideas on the windows, students used dry-erase markers.  One really important thing to remember is to sketch with the dry erase marker on the outside of the window or the opposite side that you are painting.  That way the dry erase marker does not smear into the paint.

Paint your designs.

Beginning to paint the windows created two unforeseen challenges.  One was that the tempera paint was sheer and the second challenge was the fact that you had to paint from the back to the front.

To combat the first problem, we worked in layers.  Students would paint one part of their design with one layer of their color, let that area dry, and then paint another layer later.  They repeated this process until they got the opacity they were looking for. 

In terms of painting from the back to the front, students had to kind of work in reverse.  For instance, let’s say a student wanted to paint a book with shadows under the page that was being flipped.  Our natural instinct would tell us to paint a white layer for the book pages and then add a shadow color on top of that underneath the edge of the page.  However, we had to remember that the windows would mostly be viewed from the other side- outside of the media center.  Therefore it would be best to paint in the shadow color in the areas where we wanted it and then paint the base color of white over top of that so that the shadows show on the outside.  I think this was the trickiest part of the whole project but after going outside and looking at the window from that side for a few times, the kids finally got it.

So far this project has been a super fun way to get more art around the school and to make the art students feel like a big part of the school community.  We are not done with the windows yet but so far they are looking great and the kids seem to be having a blast!

This was a pretty big undertaking but I think the benefits definitely outweigh the work and it is a project that will be in the school for years to come.  I definitely suggest seeing if your admin will go for it!

Happy Teaching!

Christine

“I’m Finished… Now What?”

A System for Creating Smooth Transitions from Project to Project

“I’m finished, now what?”.  I’m sure every one of you has had the overwhelming swarm of students draw near as they proudly shout this phrase across the room.  If you are sick of students rushing through a lesson just to sit around and socialize, you need to try this system for transitioning smoothly from project to project.

I remember when I first started teaching I got really bad anxiety towards the end of each unit.  I’d think to myself, “What are we going to do next?”, “What do I do with the students who finish early?”, “How do I introduce the next unit?”.  Luckily a teacher friend shared what he did to help make the transition from project to project a little easier and I have been using this system ever since!  

First, always make your project is due at the end of class on the day that it is due.  That way students have some class time to add finishing touches and finalize their work before they turn it in.  It also allows for something I like to call “flex time”.  This is time during which students can work on finishing up the current project or start working on the next project.

I usually wait until most of the class is about 75% of the way finished with the current project when I introduce the next unit.  I make sure the students know at the beginning of class not to get their materials out yet so I can have their full attention for my explanation.

Here’s an example of a slide that I would leave on the screen during flex time.  As you can see, the first step is to finish the current project and then there are instructions and visuals for what to do next. This slide is from an introduction to a cardboard relief sculpture unit for middle and/or high school students.

Once I have the class’ full attention, I show a slide show introducing the next unit, or next assignment, to the class.  During this time I share the main objective, student/teacher/artist exemplars, and some information about getting started on the preliminary work like sketches and/or brainstorming.  I try not to talk longer than 10-15 minutes as I have found students pretty much tune me out after that.  

After I share the information about the next project, I give the students “flex time”.  What that means is that students have uninterrupted time to work in the studio on whatever they need to get done.  The students that are finished with the current project start on the preliminary work for the next project and students that are still working on the current project have time to work on that.

The next day, I show a little more about the next steps for the new project at the beginning of class and then I give more flex time for the remainder of the period.  This system really helps with early finishers and helps prevent students from having idol time with nothing to do.  Students always have something to work on which is great for behavior management.  It also shows students that we are continuing to move full steam ahead and if they mess around they will get left behind.

I have tried this system with both my middle and high school classes and it has really helped. So the next time you are nearing the end of a unit, implement this system and I promise the transition will go much more smoothly! 
*If you are interested in the project that I am currently introducing to my year 3 middle school art students, check out my best selling cardboard sculpture unit here!

Happy Teaching!

Christine

Follow by Email
Facebook
YouTube
YouTube
Pinterest
Pinterest
fb-share-icon
Instagram