

Disclaimer: This post may contain affiliate links which means I will make a small commission if you choose to purchase through the specified link.
Using sharp materials is a scary but necessary thing in the art room… at least in a middle or high school art room. Whether it’s printmaking gouges, etching tools, or x-acto knives, there is always a particular tool that art teachers are intimidated to use with their classes.
This year, I learned the hard way that all tools, especially the dangerous ones, must be accounted for in an organized and efficient way. It’s a long story… I DO NOT want this situation to happen to you so I have come up with some systems and ideas for how to handle using x-acto knives (and other sharp tools) in your classroom.
After reading this post you will have learned:
- the best way to store x-acto knives
- how to implement a sharp tools contract
- How to distribute sharp tools
- How to collect sharp tools
Storing Your X-acto Knives:

Until this year, I have never really figured out the best way to store and contain X-acto knives safely. I have seen some custom made solutions on Pinterest like a wooden block with slits for the blades and things like that but they weren’t really attainable for me (I don’t have access to a saw to create something like that). Thus, I have been looking for something that fits an X-acto knife (blade side down) and holds it in place. I didn’t think I was asking a lot but unfortunately this solution has been much harder than I thought to find.
Earlier this year, I found this pencil holder on Amazon and it was the perfect solution! There are 30 holes so there is enough space for a class set of knives and the holes are just the right size for placing a standard X-acto knife inside. (Please note that the X-actos do not fit blade side down if they have caps). Do all of your caps get lost too??? The holes are also numbered so if you number your X-acto knives, there is a designated spot for each one.
Speaking of numbering your knives, I used a piece of masking tape wrapped around the end of the knife (furthest from the blade) and a Sharpie to label each one. This worked pretty well. Full disclosure: I do want to eventually find a more permanent way to put the numbers on the knives because kids can simply peel off the tape if they really want to be sneaky. Maybe some sort of engraving tool would work best for this? I’ll have to try that out and report back!
Making a Sharp Tools Contract:

It is extremely important that students understand that using tools like X-actos and gouges is a privilege and not a right. Therefore, they must handle them as such.
I think the best way to hold each student accountable for their materials is to use a sharp tools contract. To be honest, I have not yet implemented a student contract in my classroom but I definitely plan on doing it the next time we use these tools.
Before students sign the contract, I would demo how to use the X-acto knife or other tool by doing an in-person demo or a video demo. A video demo is probably better because you can zoom in on the tool so students can really see what you are doing. I used a video demonstration this year and I think it worked well. Read the contract as a class and have students sign the document when you are finished going over it.
If a student is ever using a tool improperly, you can pull out the contract with their signature and reiterate that they promised to use the tools responsibly. You can check out my FREE sharp tools contract and sign out sheet here.
Distributing Sharp Tools:
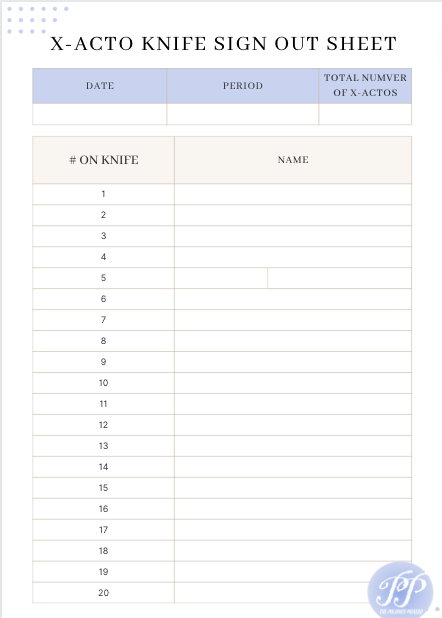
Holding each student accountable for their own tools is very important- especially when the tools come with a large amount of responsibility. I have found that the best way to hold students accountable is to have them sign out their X-acto knives. I created a simple form with a column for the number and the student’s name and have them come up to a central location to sign them out.
You may want the sign out sheet and the tools to be located near your desk so you have a better eye on them. If you have classes of 33 students like me, this might take a while for all of them to get distributed. So I suggest dismissing each table, one by one, to sign out their knives.
Another thing that could be a good idea is to use the X-acto knives at a designated station. I did not do this but I got the idea from my fellow art teacher for whom it seemed to work really well! He had one table in the room set up with 5-6 stations (each with a cutting mat and X-acto knife). He then had students come to a station and cut while he watched over that table specifically. I guess the trick with this is figuring out what the other students should be doing while they are waiting for a cutting station. I know his classes are smaller than mine so this might work better if you have smaller class sizes as well.
How to Collect the Tools:
There are a few different ways that you can go about having the students return their sharp tools. One way is to sign their X-acto knives back in on the sign out/in sheet. If you do this, you just have to make sure that all knives have been accounted for. If you use the pencil holder like I used, then all you have to do is make sure there are no empty holes. This method is good for classes that you trust a little bit more.
The method worked for me until I had 5 go missing at the end of class one day. Unfortunately, this was before I used a sign out sheet. It was a very scary moment and ended up turning into a huge deal with administration… but that’s a story for a different day!
What I do now is carry the pencil holder and walk around the room to collect the X-acto knife from each student at the end of class. That way I can physically see them put the knife back in the container and I know who lost track of one if something like that happens again. This seemed to work pretty well and I think it was definitely quicker than having all of the students sign their knives back in.
Give Yourself Grace:
The first time using these kind of tools with your classes can be intimidating and even scary. All you can do it use your best judgement and try to have as many systems in place as possible to help you out.
Just remember, if a student really wants to destroy an eraser with an X-acto knife or use one in an inappropriate way, they probably would have found another way to cause this destruction even if there was not an X-acto knife involved. You can only do so much and prevent so much!
I hope these tips help make using these tools a little less intimidating and give you a little more confidence going into projects that involve them.
Happy teaching!
Christine