
*This point contains affiliate links
Making your art department’s presence known is super important for creating a school community through art. Some ideas for promoting your department are hanging your students’ work up in the hallway and around the school, giving students the opportunity to participate in art shows, and having students take part in school-wide projects.
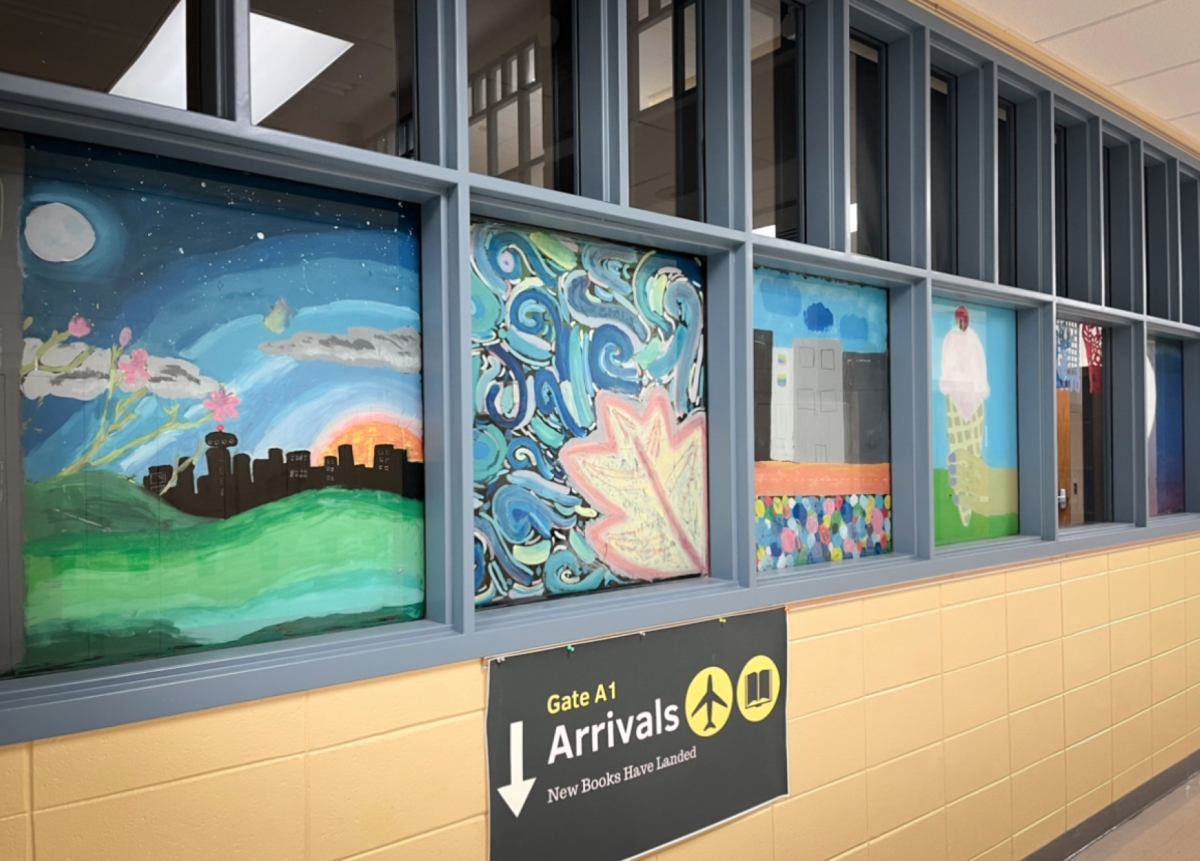
One school-wide project that my art club students have been doing since the beginning of the year is painting the windows in the media center. The media center is in the middle of the school so it gets a lot of traffic. There are about 16 windows that we are painting so it is a big task but the kids are loving it and it’s a great opportunity for the art department to be recognized by the school!
In order to accomplish a project like this, there are a few things to keep in mind. Check out my advice for painting the windows in your school below:
Ask for Permission:
This is the MOST important thing to do before starting any project at your school. I would make sure you not only have the administration’s permission but you also have the permission of the staff that work in/use that area. In this case, the media specialist actually came up to me and asked if we wanted to re-paint the windows that had been painted previously so we knew it had already been approved by admin and the media team.
Clean the Area:
Cleaning the previously painted windows took me hours because I did not figure out what tools worked best until about halfway through (At least I get to save you guys the trouble!). Once I discovered a good system, it went much more smoothly and my arms were not nearly as sore!
The windows had previously been painted with tempera paint so I knew the artwork could be removed with water. I filled a large bucket with water and a sponge and I first used a damp sponge to blot the entire window to moisten the paint. Pro tip: DO NOT try to wipe the paint off with the sponge like I did. The paint will be really hard to scrub off and it will be very streaky. This method will also require wiping the windows down about 10 times because the paint just keeps smearing. Instead, use a razor, like this, to scrape off the moistened paint. The paint will almost come off in sheets.
You can skip moistening the paint with the sponge and go straight to the scraping but it can tend to sound like nails on a chalkboard and turns the paint into dust that goes everywhere. So I suggest getting the paint damp before you begin scraping.
Prep the Area:
Although tempera paint comes off pretty easily with water, I did not want kids to have to wipe off their window trim after they started painting. So I simply ran a line of painter’s tape along the trim of the windows so that we could keep that area clean and get clean edges for our paintings.
The next thing I would do is cover EVERYTHING in the area that you are painting with roll paper or butcher paper. I was so scared of getting paint on the carpet in the media center so I covered the bookshelves, tables, and floor with roll paper (like the kind you use for bulletin boards). Unfortunately I had to re-do this process every time we painted because we only have art club every other week and I did not want to leave that whole setup there for 2 weeks when the media center is used every day.
In terms of materials, I took one of the metal carts we had in the art room and filled it up with the following:
-paper plates (for mixing paint)
-brushes
-tempera paint jugs
-bucket of water (so we didn’t have to run back and forth to the room to fill our cups up in order to rinse out the brushes)
-foil (for covering the plates with paint at the end of the meeting) I love using this because it is so easy to grab and go!)
-permanent markers (to write their names on the foil on top of their paint plate)
-paper towels
-dry erase markers (for sketching out the designs on the windows)
-razor (to scrape off any paint mistakes that have dried- make sure this is a tool only YOU are handling. Do not let the students use this!)
-cups for water (I used just plastic SOLO cups).

Sketch out the design.
Before I even took students to the media center, I had them create 3 colored sketches on a handout that had boxes proportionate to the size of the windows. When the students were done with their ideas, they showed me their three sketches and we discussed which one would be best for our project. This is a really important stage because if you give students free reign for their designs, you could end up with very strange and/or inappropriate imagery (Seriously! One student wanted to paint a demon cat and I had to quickly veto that idea). I told them that our goal was to paint windows that inspired hope, creativity, inclusivity, kindness, and happiness.
This next tip was actually thought of by a student and I think it is super clever! In order to sketch out their ideas on the windows, students used dry-erase markers. One really important thing to remember is to sketch with the dry erase marker on the outside of the window or the opposite side that you are painting. That way the dry erase marker does not smear into the paint.
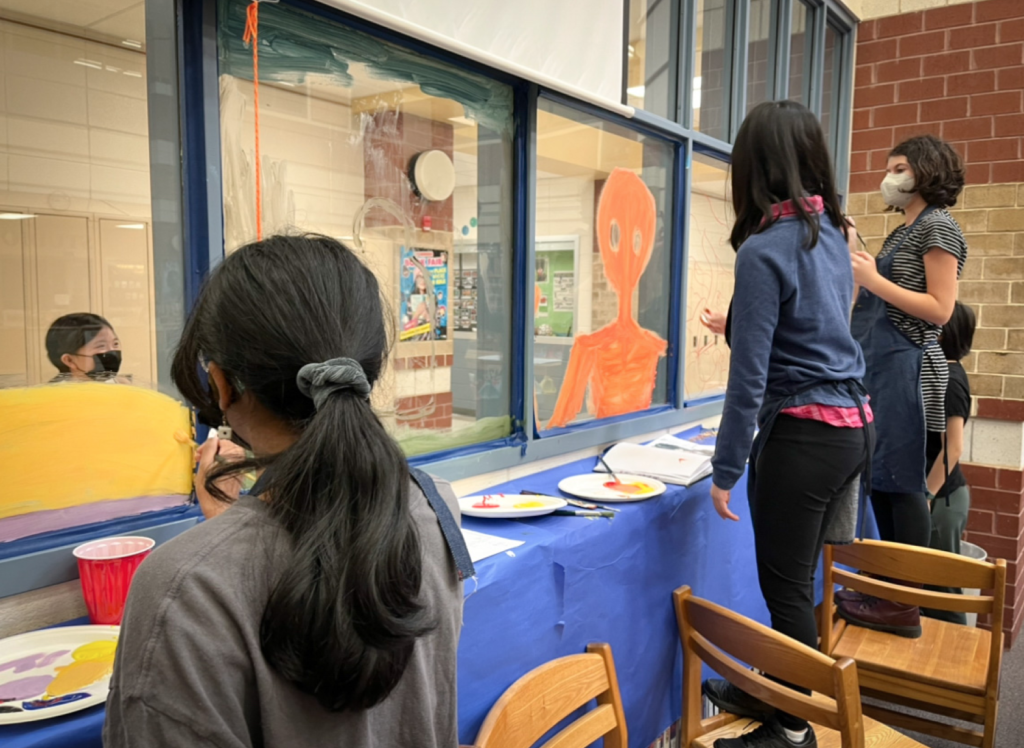
Paint your designs.
Beginning to paint the windows created two unforeseen challenges. One was that the tempera paint was sheer and the second challenge was the fact that you had to paint from the back to the front.
To combat the first problem, we worked in layers. Students would paint one part of their design with one layer of their color, let that area dry, and then paint another layer later. They repeated this process until they got the opacity they were looking for.
In terms of painting from the back to the front, students had to kind of work in reverse. For instance, let’s say a student wanted to paint a book with shadows under the page that was being flipped. Our natural instinct would tell us to paint a white layer for the book pages and then add a shadow color on top of that underneath the edge of the page. However, we had to remember that the windows would mostly be viewed from the other side- outside of the media center. Therefore it would be best to paint in the shadow color in the areas where we wanted it and then paint the base color of white over top of that so that the shadows show on the outside. I think this was the trickiest part of the whole project but after going outside and looking at the window from that side for a few times, the kids finally got it.
So far this project has been a super fun way to get more art around the school and to make the art students feel like a big part of the school community. We are not done with the windows yet but so far they are looking great and the kids seem to be having a blast!
This was a pretty big undertaking but I think the benefits definitely outweigh the work and it is a project that will be in the school for years to come. I definitely suggest seeing if your admin will go for it!
Happy Teaching!
Christine